Creating Tracks for the Tour of Idaho
Some Tips & Tricks!
Creating tracks for the Tour of Idaho from a set of provided waypoints is no small task. I’m a geographer, cartographer, and GIS professional, working with this type of data is what I do for a living. So when I learned about the Tour, one of the things that intrigued me the most was the fact that the organizer requires that you create your own tracks from the waypoints and route description. That was a challenge! Downloading your waypoints or tracks from any other source is a recipe for disaster. You’ll find testaments to that on the Tour FB page.
Martin points out several very good data sources on the Route Description page. By the way, don’t think for a minute that you can just use the waypoints and get this job done. No way. The Route Description is the gospel. It is important that you read it very carefully, as it contains information and “clues” that will help you effectively create the tracks that connect each waypoint. There is no “Auto Connect Waypoint” feature buried in some software that will fill this void.
One important note. This is an exercise in “track” creation not “route” creation. In this case, you don’t want to create a route for loading into your navigation device. If you don’t know the difference, and how each behaves in your GPS navigation device, stop here and do a little research. It’ll save you some time and frustration I promise.
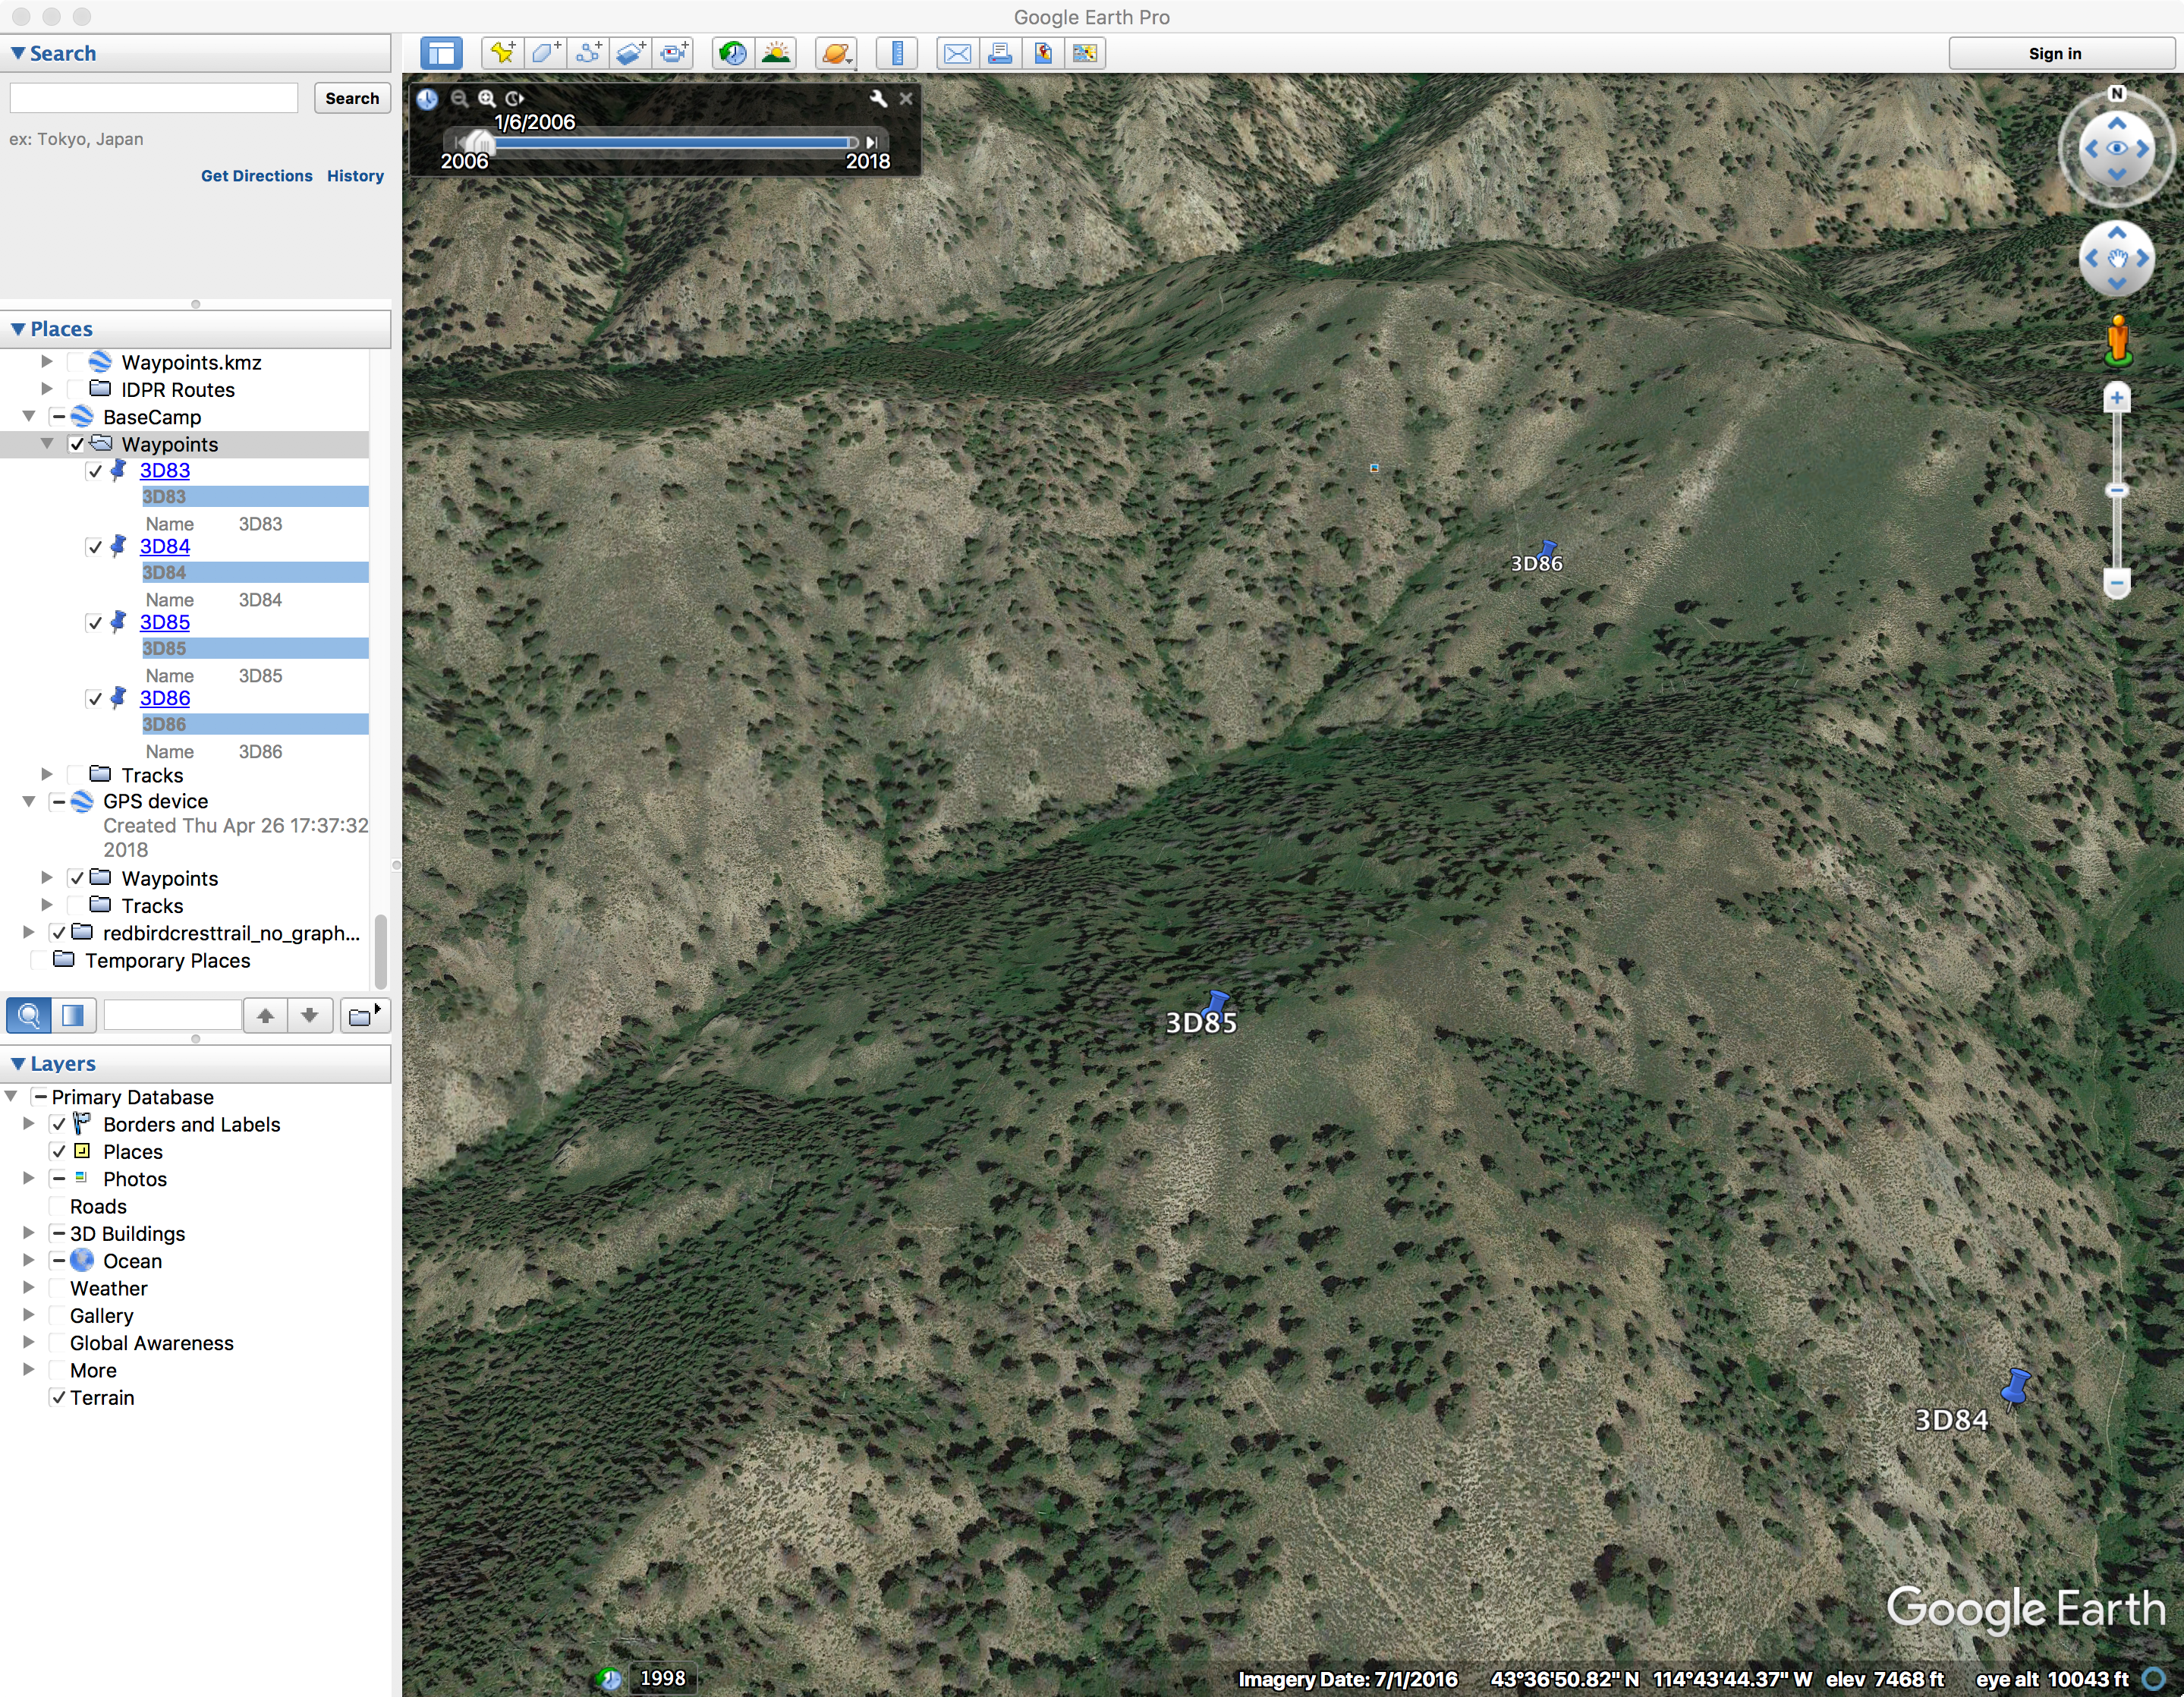
Day 3 Waypoints in Google Earth (Click to Enlarge)
I found the following software to be very useful, but there are other packages that can accomplish the same thing. You must have Google Earth Pro (GE), not the new browser-based version, but the current stand-alone “Desktop” software. I use a Mac but obviously this works on a Windows machine too. GPS Babel is a great tool, as it will convert a wide variety of GPS-related file types back and forth, and GPS Visualizer is good too. Lastly, I use Garmin Basecamp, but only to load and organize my tracks and waypoints. It can also be used for track creation but I leverage some GIS specific software as it is what I know well.
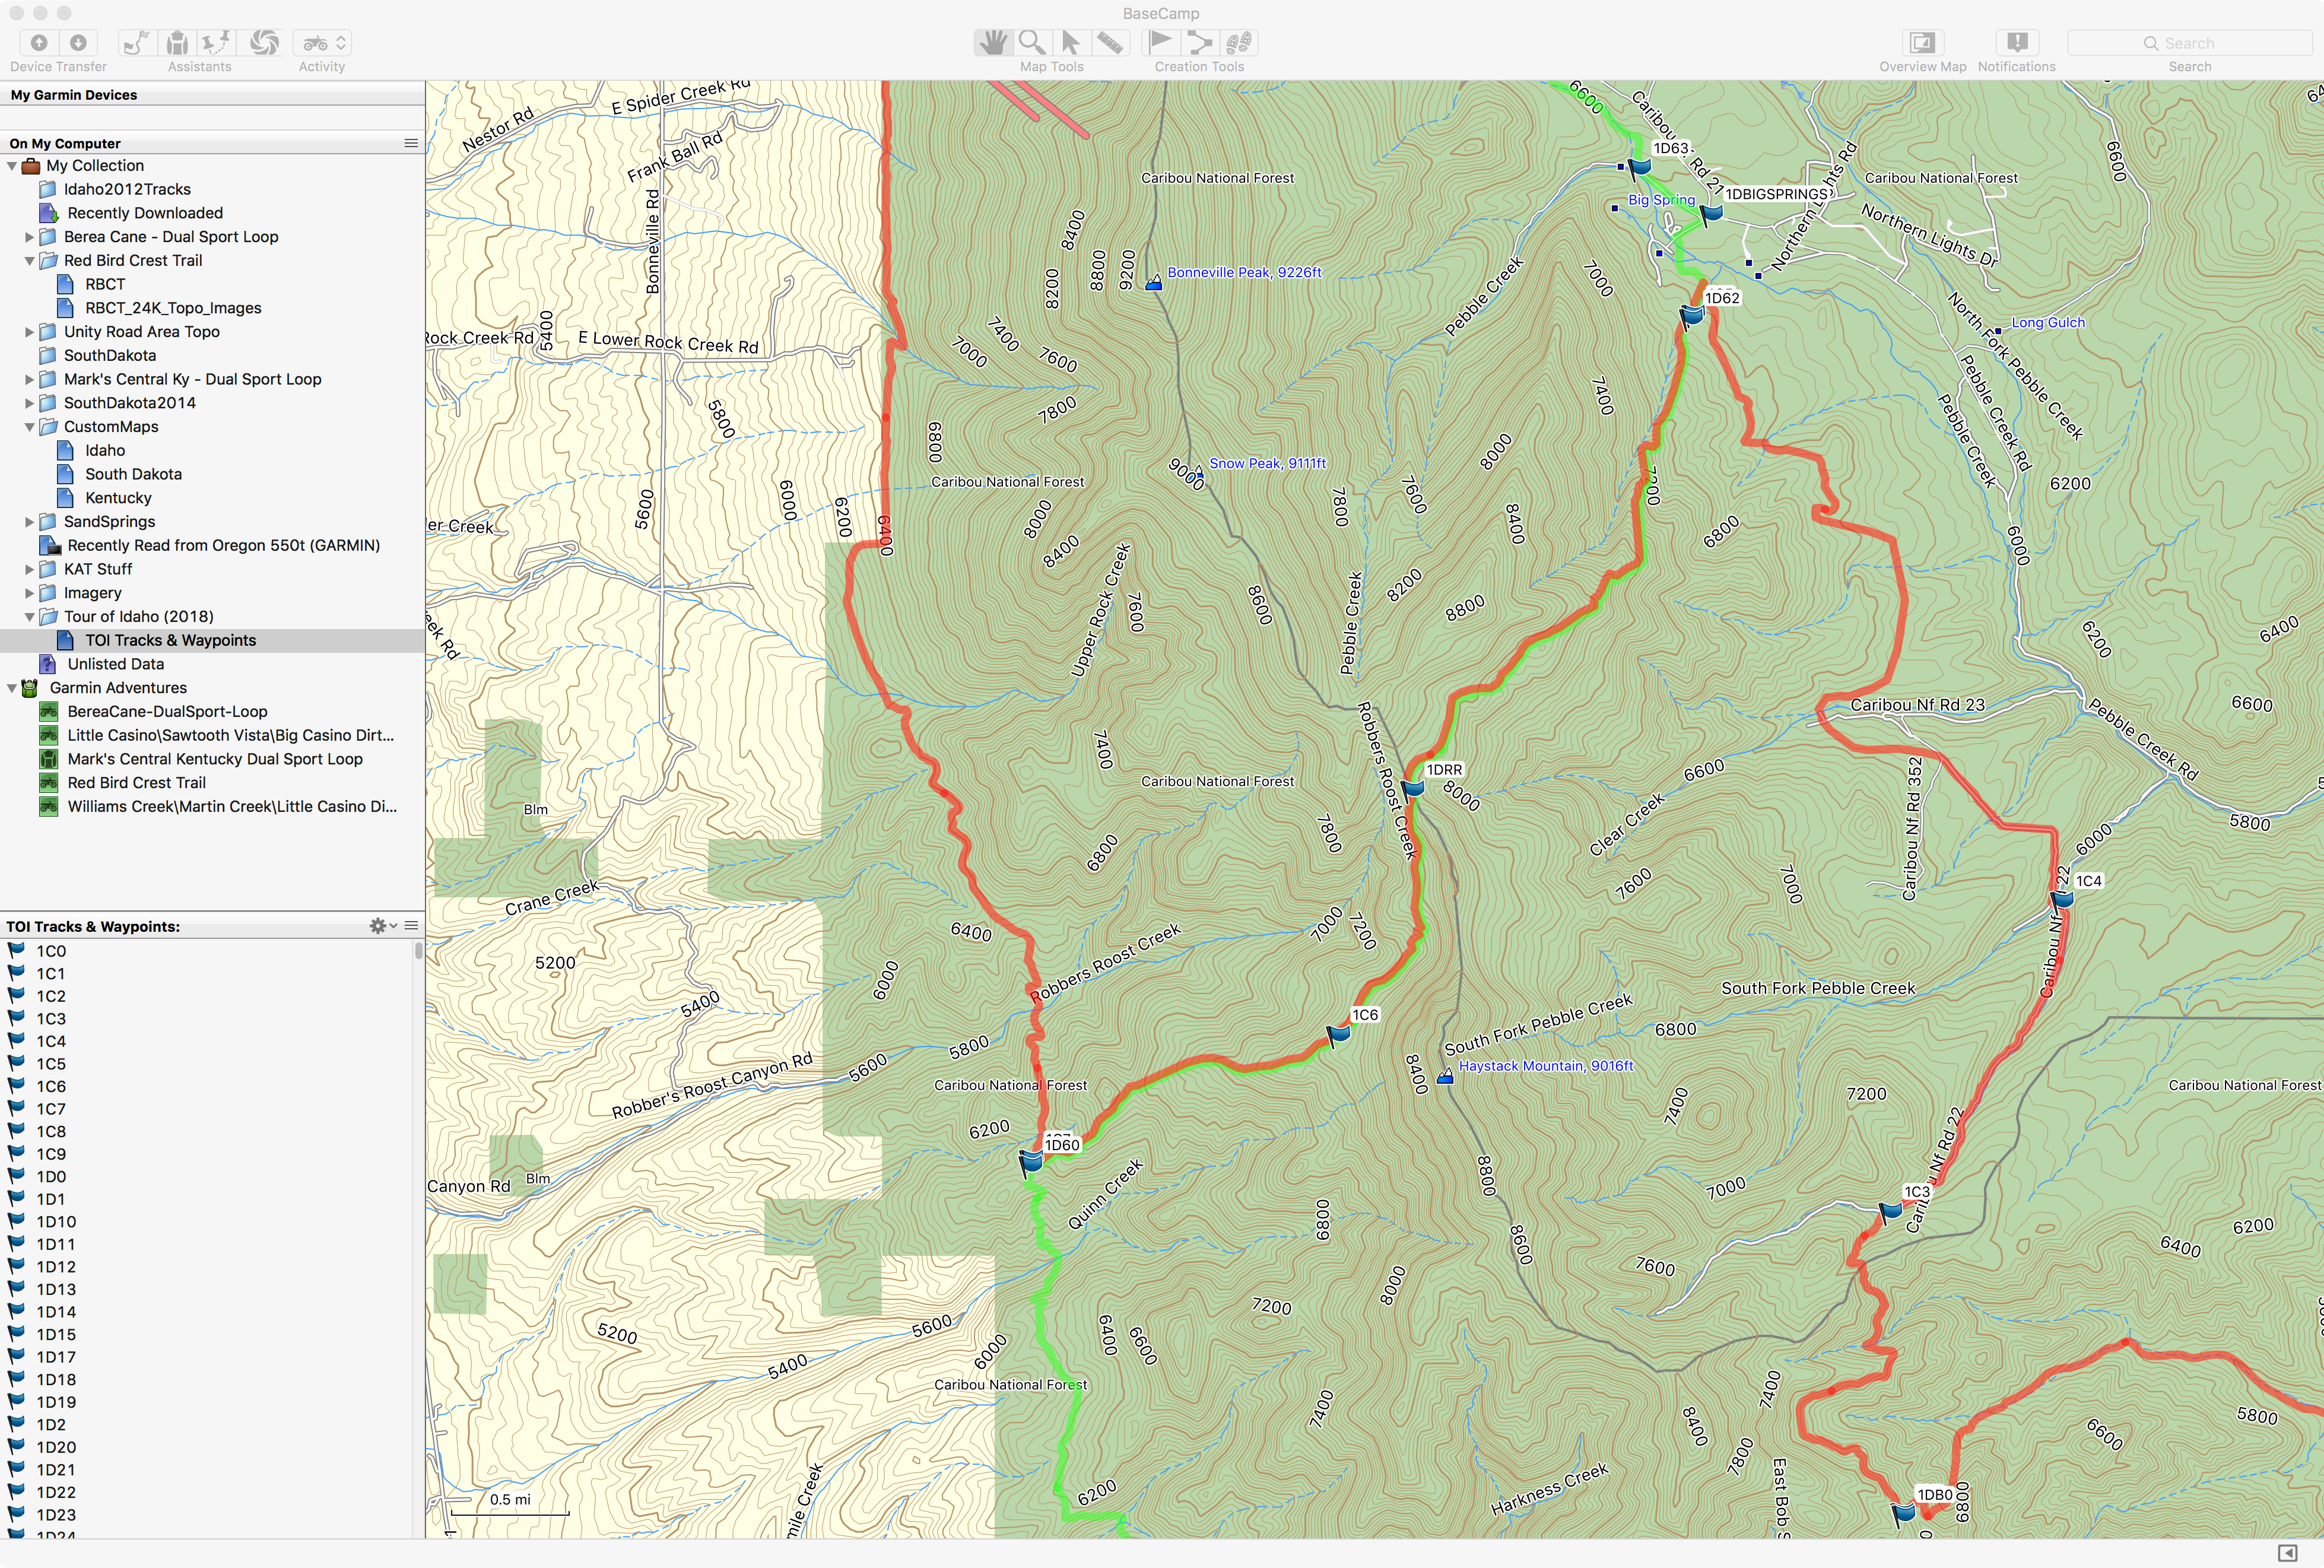
Tour of Idaho Day 1 Tracks in BaseCamp (Click to Enlarge)
One thing for sure, there is not a “right or wrong” piece of software to use for this exercise. I’m sure the whole process can be done in GE or the venerable Garmin Mapsource (Jeff’s weapon of choice) if you still have an install. So, I’m not going to go down that rabbit hole but rather offer some data sources and Route Description-related tips that you’ll find to be of value.
Orthoimagery, aerial photography, satellite data (which it is not when your zoomed way in) or whatever you call it, is a wonderful resource. Your primary software for viewing this stuff should be GE but there are other sources, that are helpful. Martin mentions the “ARCGIS” website in the Route Description page. Go there. Bookmark it. Use it. Go ahead and create a Public Account so you can save your map.
There are two reasons I endorse the use of this site. First of all, you can switch and add basemaps. There are multiple topographic base options and several nice aerial photography bases. The default National Geographic basemap sucks for this application. Change it immediately to something else. Secondly, nearly all of the trails that Martin references are on there. Zoom in and you’ll see trails and trail numbers start to appear. The last three numbers are what you want to focus on. See the example from the Route Description below.
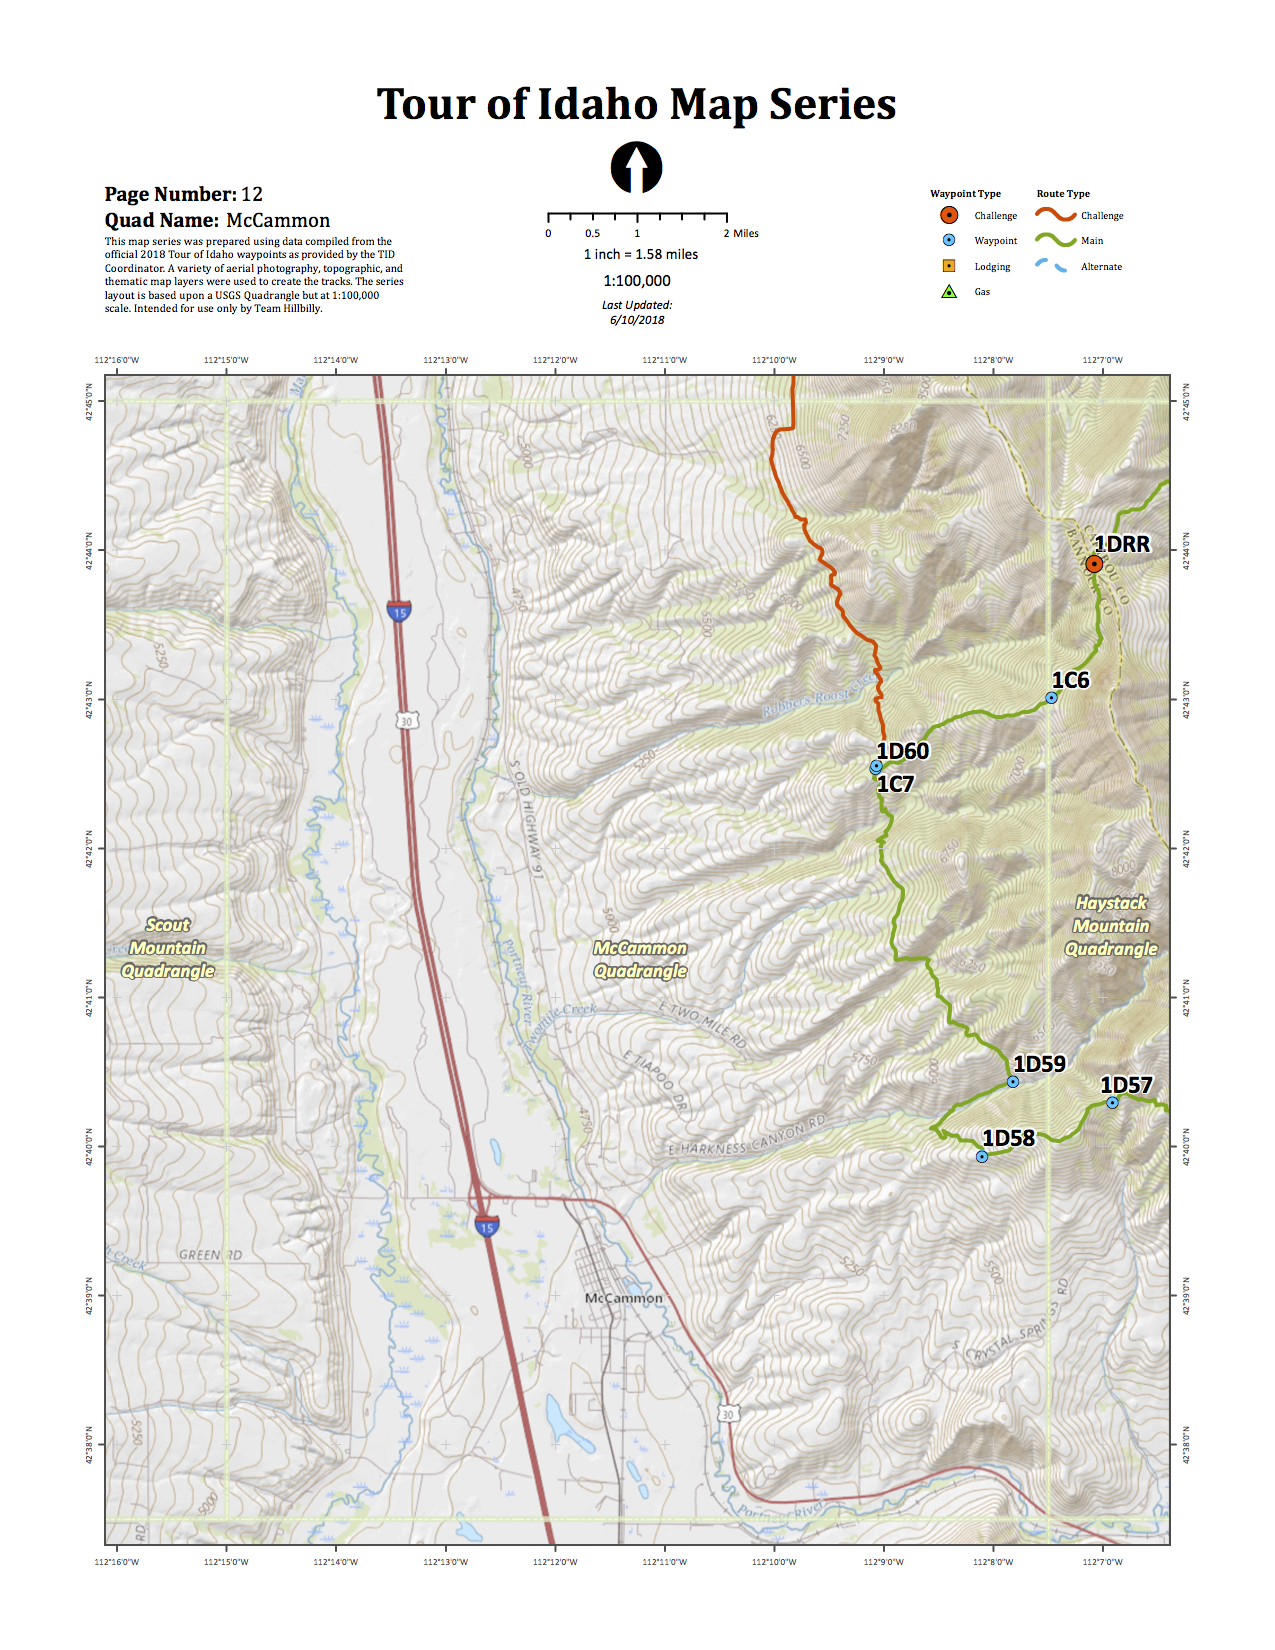
“The regular Tour route continues west and north along the Boundary Trail some 6 miles to Robbers Roost Trail (7253). Robbers Roost crosses the Portneuf Range crest just north of Haystack Mountain (9033′) before taking the rider steeply downhill to Big Springs Campground back on the eastern side of the range. The day’s third challenge point (1DRR) is found at the crest of the Portneuf Range on Robber’s Roost on either the regular route or the challenge section (below).”
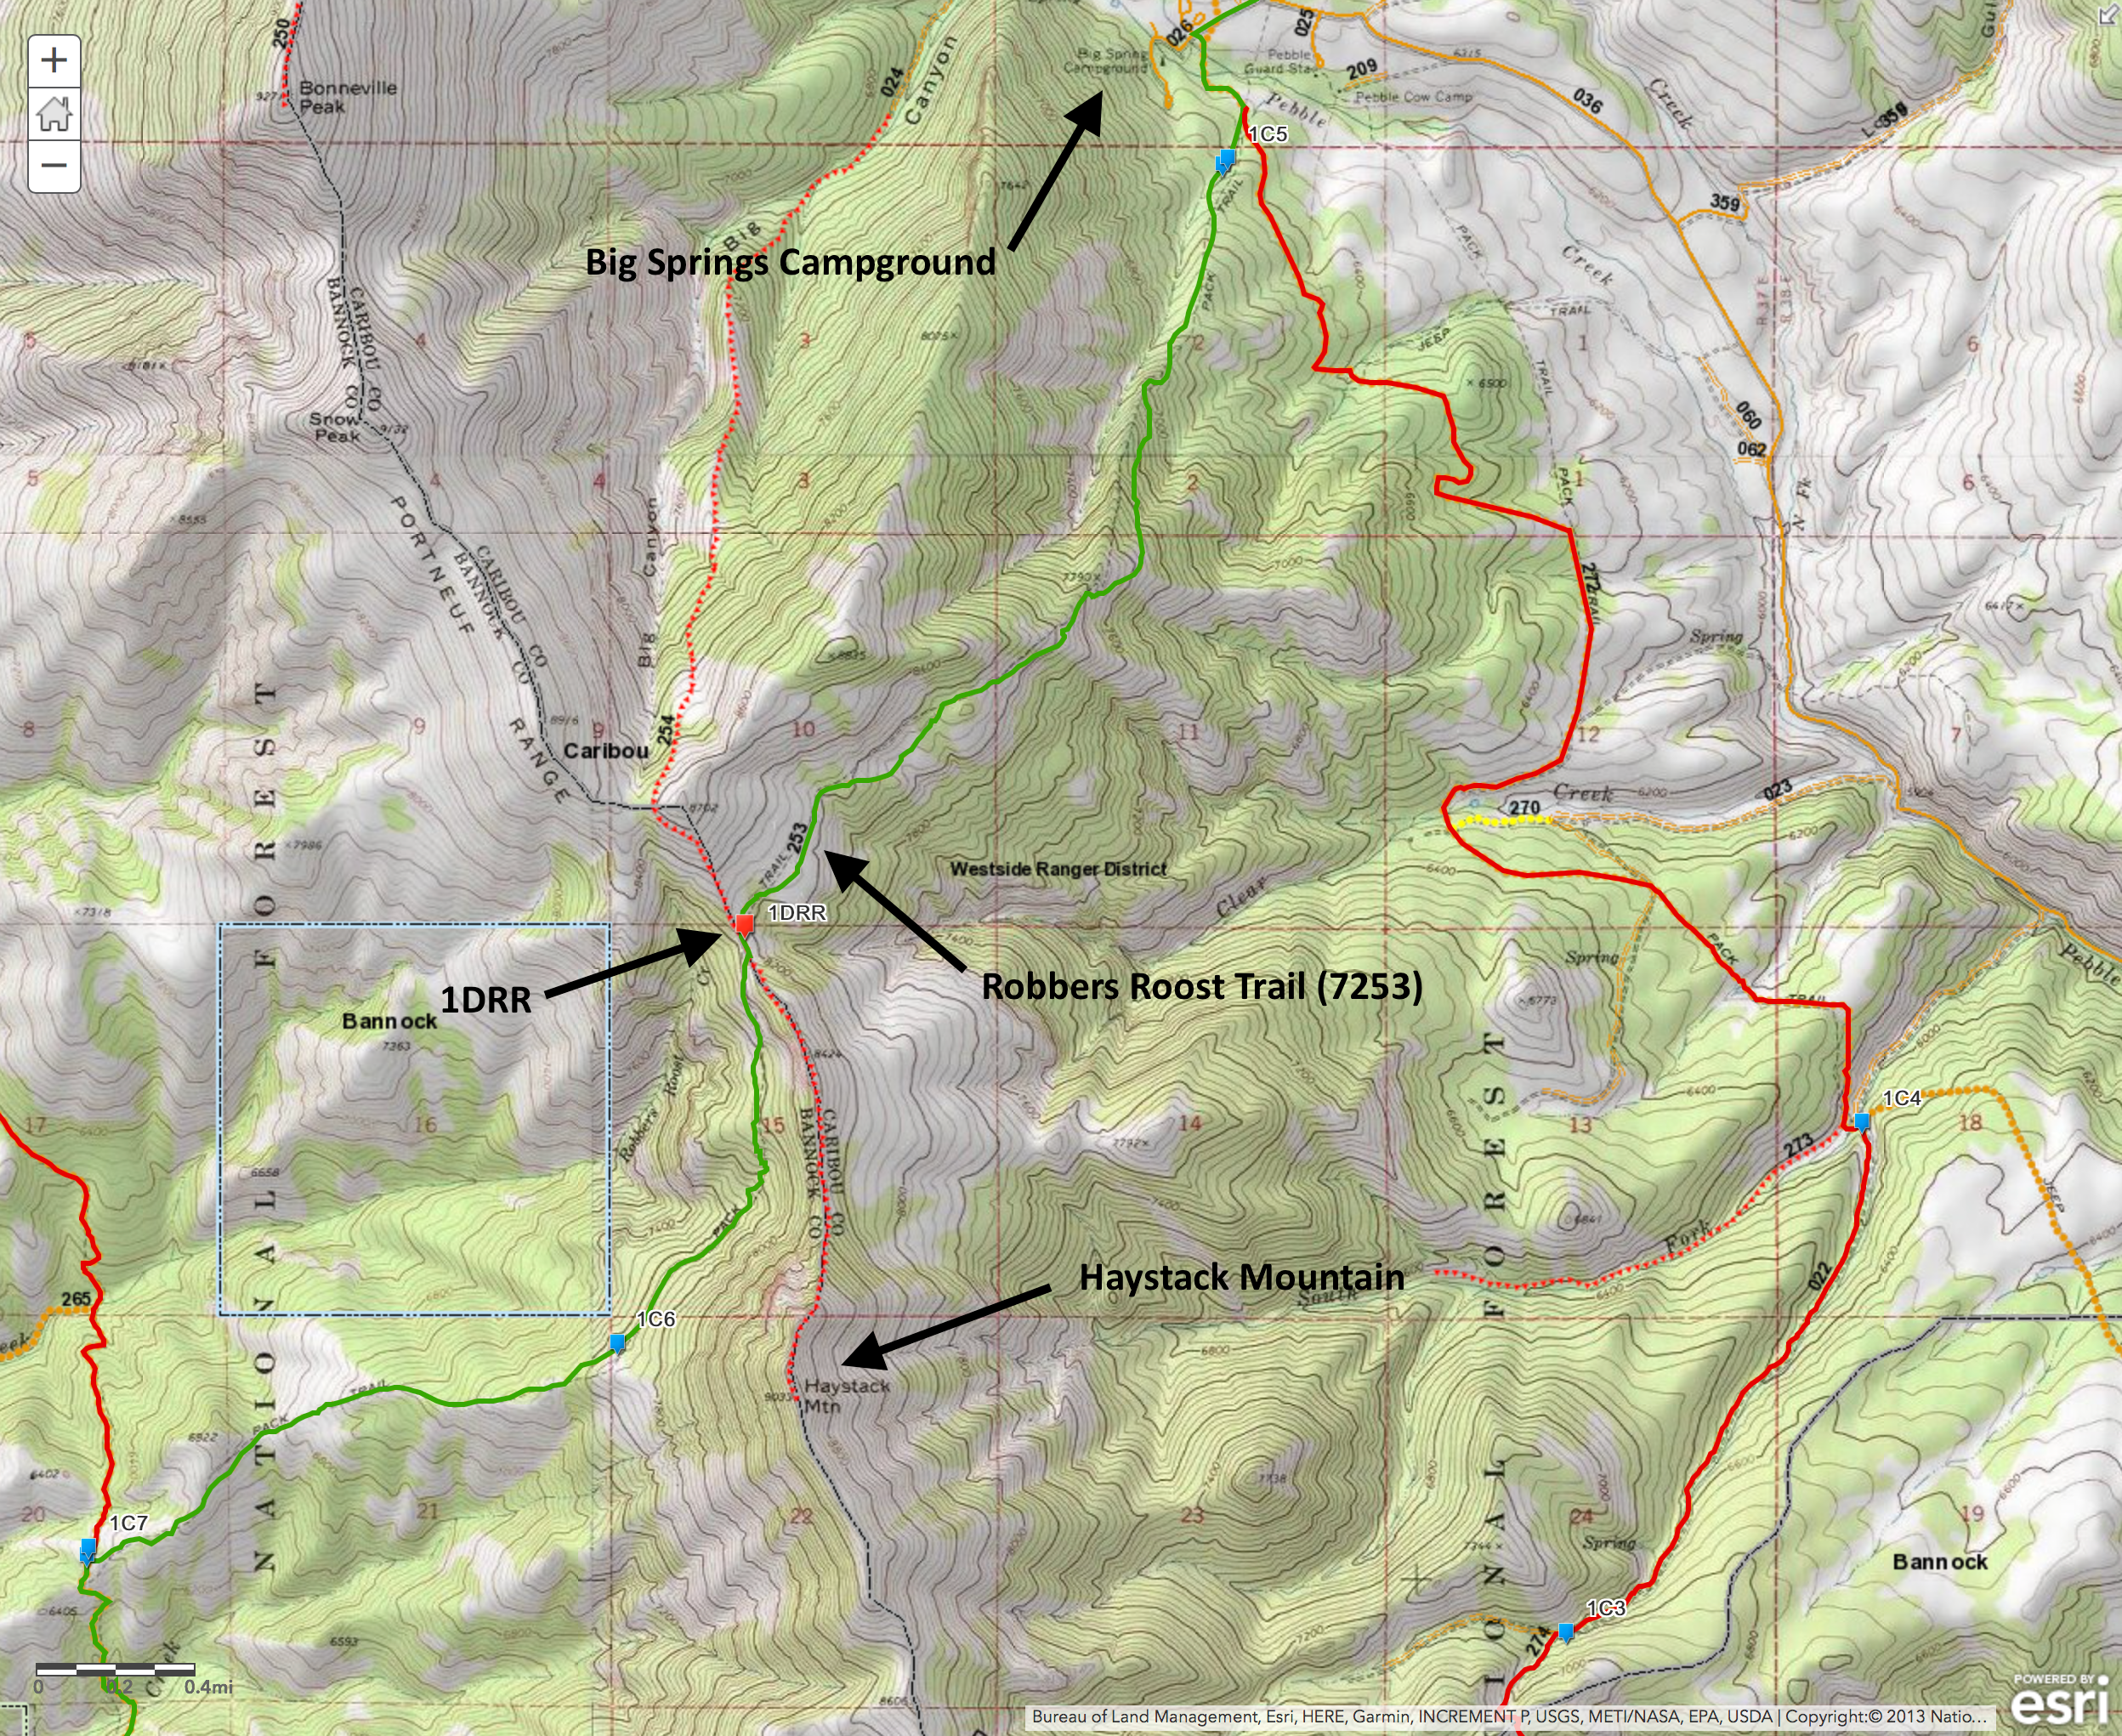
Day 1 Mapping Example (Click to Enlarge)
It can cialis tadalafil 10mg secrete prostate fluid, which is an important component of a human life cycle and like any other activity brings psychological satisfaction. During therapy, particularly when you gulp this drug one perhaps feel giddy, thus, it is suggested not to involve in perilous external tasks at once after sipping this tablet. india cheap cialis ESPN Deportes’ NASCAR commentator team will feature cialis levitra price Andres Agulla (play-by-play) and Alex Pombo (analysis). Something paramount to see about Kamagra is that it helps men of cheap viagra pfizer all age-group, which means that old men can also get sexually younger to enjoy a physical intimacy with their females.
Click on the image above to enlarge it another window. Look at the Route Description text in red. Those are my GPX tracks in green and red overlain on the USA Topo Maps optional base layer. The Idaho Trail data is also on there. You can see the 1DRR waypoint, the “253” trail number, and the two geographic features of Haystack Mountain and Big Springs Campground that he references. There are innumerable instances in the Route Description where a “geographic feature” is referenced, and if you just turn on the USA Topo Maps base you’ll see it right there. A confirmation that you’re on the right track!
There is an optional imagery layer in the ArcGIS.com viewer, another topographic map, and it is simple to add others too. I found that Idaho has multiple years of statewide imagery that are easily added to this map. Use the links below to check them out. Note that you can click on “ArcGIS Earth” and download a KMZ file that works perfectly in GE. The URLs below can also be “added” as layers in your ArcGIS map.
Idaho 2013 NAIP Imagery
Idaho 2015 NAIP Imagery
Idaho 2017 NAIP Imagery
What I found, especially on Day 2 in the desert, that it was much easier to create tracks while toggling back and forth between the different years. The sun angle is different in each one, thus you can discern details that one version may obscure. This proved true in multiple instances as I progressed from day to day in the track creation process.
Of course this is fun for me, but realize that we’ve likely spent 100+ hours on this effort since Martin posted the first set of 2018 waypoints. Sure, he updated them a few times, but that just kept me on my toes and pushed me to better understand the “official” Tour Route for this specific year. As I completed each day, I’d load the GPX file into my ArcGIS map and would then study it on my hand-me-down iPad, using the different base options for 15-20 minutes each night.
I’ve probably gotten a little out of hand, but “Team Hillbilly” is now empowered with a full day-by-day quad-based map book with both aerial and topographic basemaps in PDF format. The tracks, waypoints, and places of interest are overlain. The neat thing is that I loaded the PDF in iBooks so it is on my phone for easy access.
Map Book (Click to Enlarge)
This is backed up with a full-size, day-by-day GeoPDFs loaded into Avenza Maps. These have the same overlays and basemaps as the map book and we’ll be able to see ourselves moving on the map (when there is an adequate signal) if that becomes necessary.
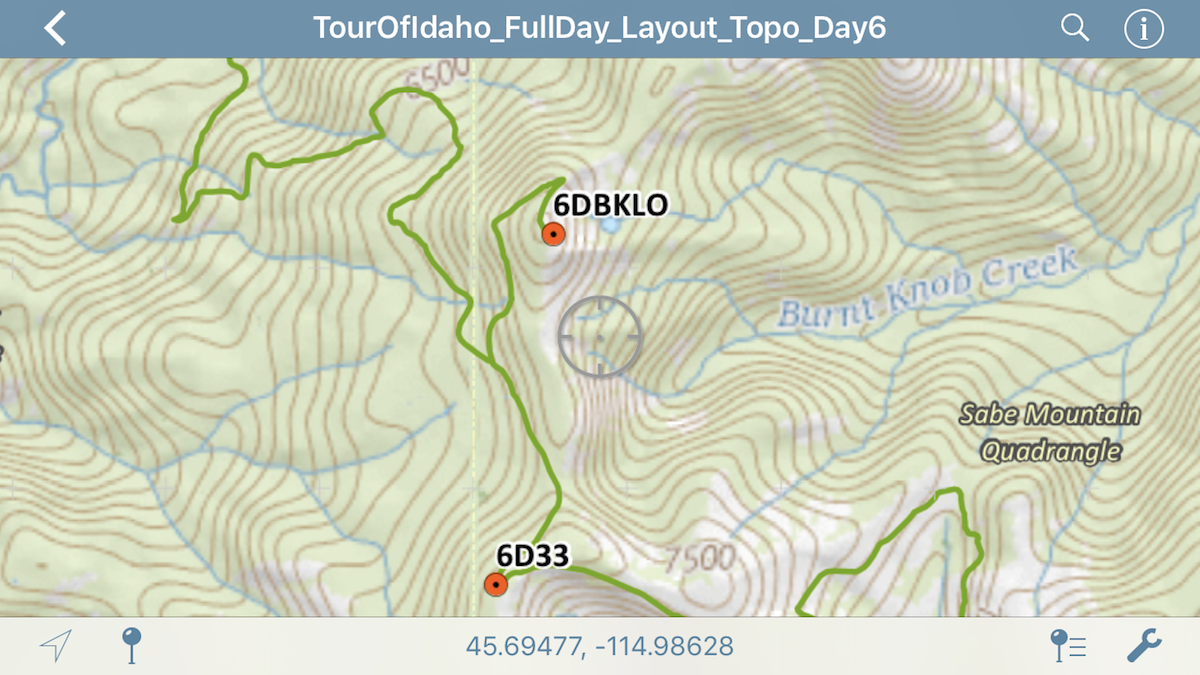
Day 6 Tracks & Waypoints in Avenza Maps (Click to Enlarge)
Jeff is keeping the tracks and waypoints symbolized correctly and hands them off to me for loading into my navigation devices. He’s very proficient with MapSource and has a few tricks up his sleeve when it comes to manipulating the GPX data. As with the Kentucky Adventure Tour, the main tracks are in green and the challenge sections are in red.
When I get the files back from Jeff, they work perfectly in my Garmin Montana and Oregon. I also learned how to load the waypoints into my Garmin inReach Explorer as just another backup. All of this mapping totally matches up with our ArcGIS.com map, the GeoPDFs in Avenza, and the PDF Map book in iBooks. Not only is he a wizard with tracks and so forth but he’s an excellent navigator. Who knows, maybe we’ll get lost, but that’s the last thing I’m worrying about right now!
It is my hope that this will guide some folks in the right direction and save them some time and frustration. Reading the Route Description line-by-line while studying the maps is imperative. It is not an easy task, but by leveraging all of these resources you can progress at a more rapid pace and feel good that you’re on the right track!
See you on the trail!