
The New Travel Machine – Report #2
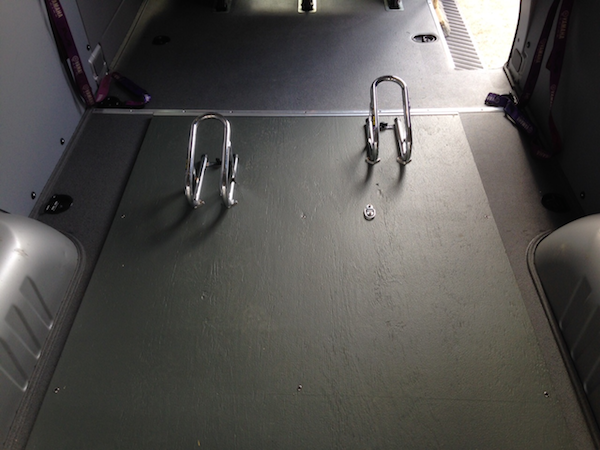
Bike Hauling Stuff: My first priority with the new Sprinter was to get it setup for hauling at least two bikes. You could fit 5 in there but one would have to remove the passenger seats. Not going to do that. I’d seen several options online for accomplishing this and in the end I used a modular approach that didn’t require me to drill holes through the primary metal floor of this brand new vehicle.
I’d picked up a piece of 4′ x 8′ plywood on the Friday I brought it home anticipating I’d need it for mounting some wheel chocks. I had a set of Pingel-brand chocks in the trailer and was really pleased with their mounting options, easy removal when not needed, and build quality. I ordered another chock from Lee’s and started studying the best way to secure it to the floor. By the way, there is a 1/2″ sheet of polymer-coated wood underneath the rubber floor mat that covers the entire cargo area. Thus, securing anything to the floor will be a breeze.
Wheel Chocks
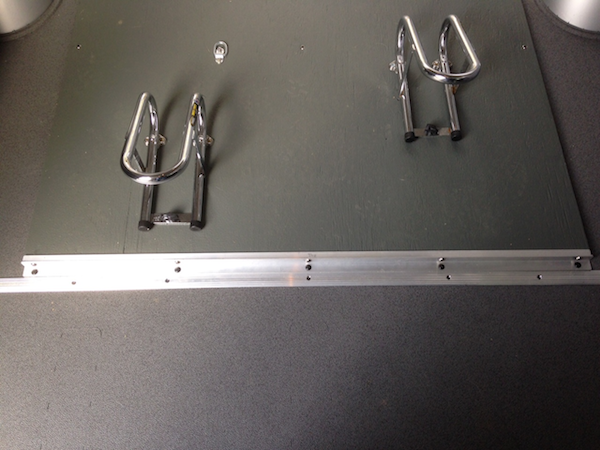
Knowing that the hauling surface would get dirty and wet at times I decided to coat the entire piece of plywood with some Olympic deck paint that we got in a dark gray. It leaves a water-resistant, gritty type surface that won’t be slick when wet and should clean up well. I put two coats on the bottom and 4 coats on the top. The ends were covered with 4′ C-channel aluminum pieces and secured accordingly.
I laid it up in the van and then figured out where to place the wheel chocks. In the end, I staggered them just a bit and made sure there was ample room for the bars to not hit the walls (that’s another concern I’ll address later). Securing the chocks was easy with the 1/4-20 T-nuts on the bottom and stainless steel hardware.
A 1″ x 1″ piece of L-shaped aluminum was mounted to the floor just behind the existing aluminum strip at the transition from the passenger to the cargo area. Black automotive-type sheet metal screws with finish washers were used for mounting to the wooden floor.
Wheel Chock Board Mounting
The coated plywood was situated just behind the L-shaped aluminum strip and secured accordingly. Sheet metal screws of the appropriate length and stainless steel finish washers were evenly distributed along the edges and down the middle to bind it to the floor. It is solid and not going anywhere, especially with two bikes on it. One other good thing about this Sprinter is the abundance of factory D-rings in the floor. They are sturdy, placed very well, and made doing this job much easier.
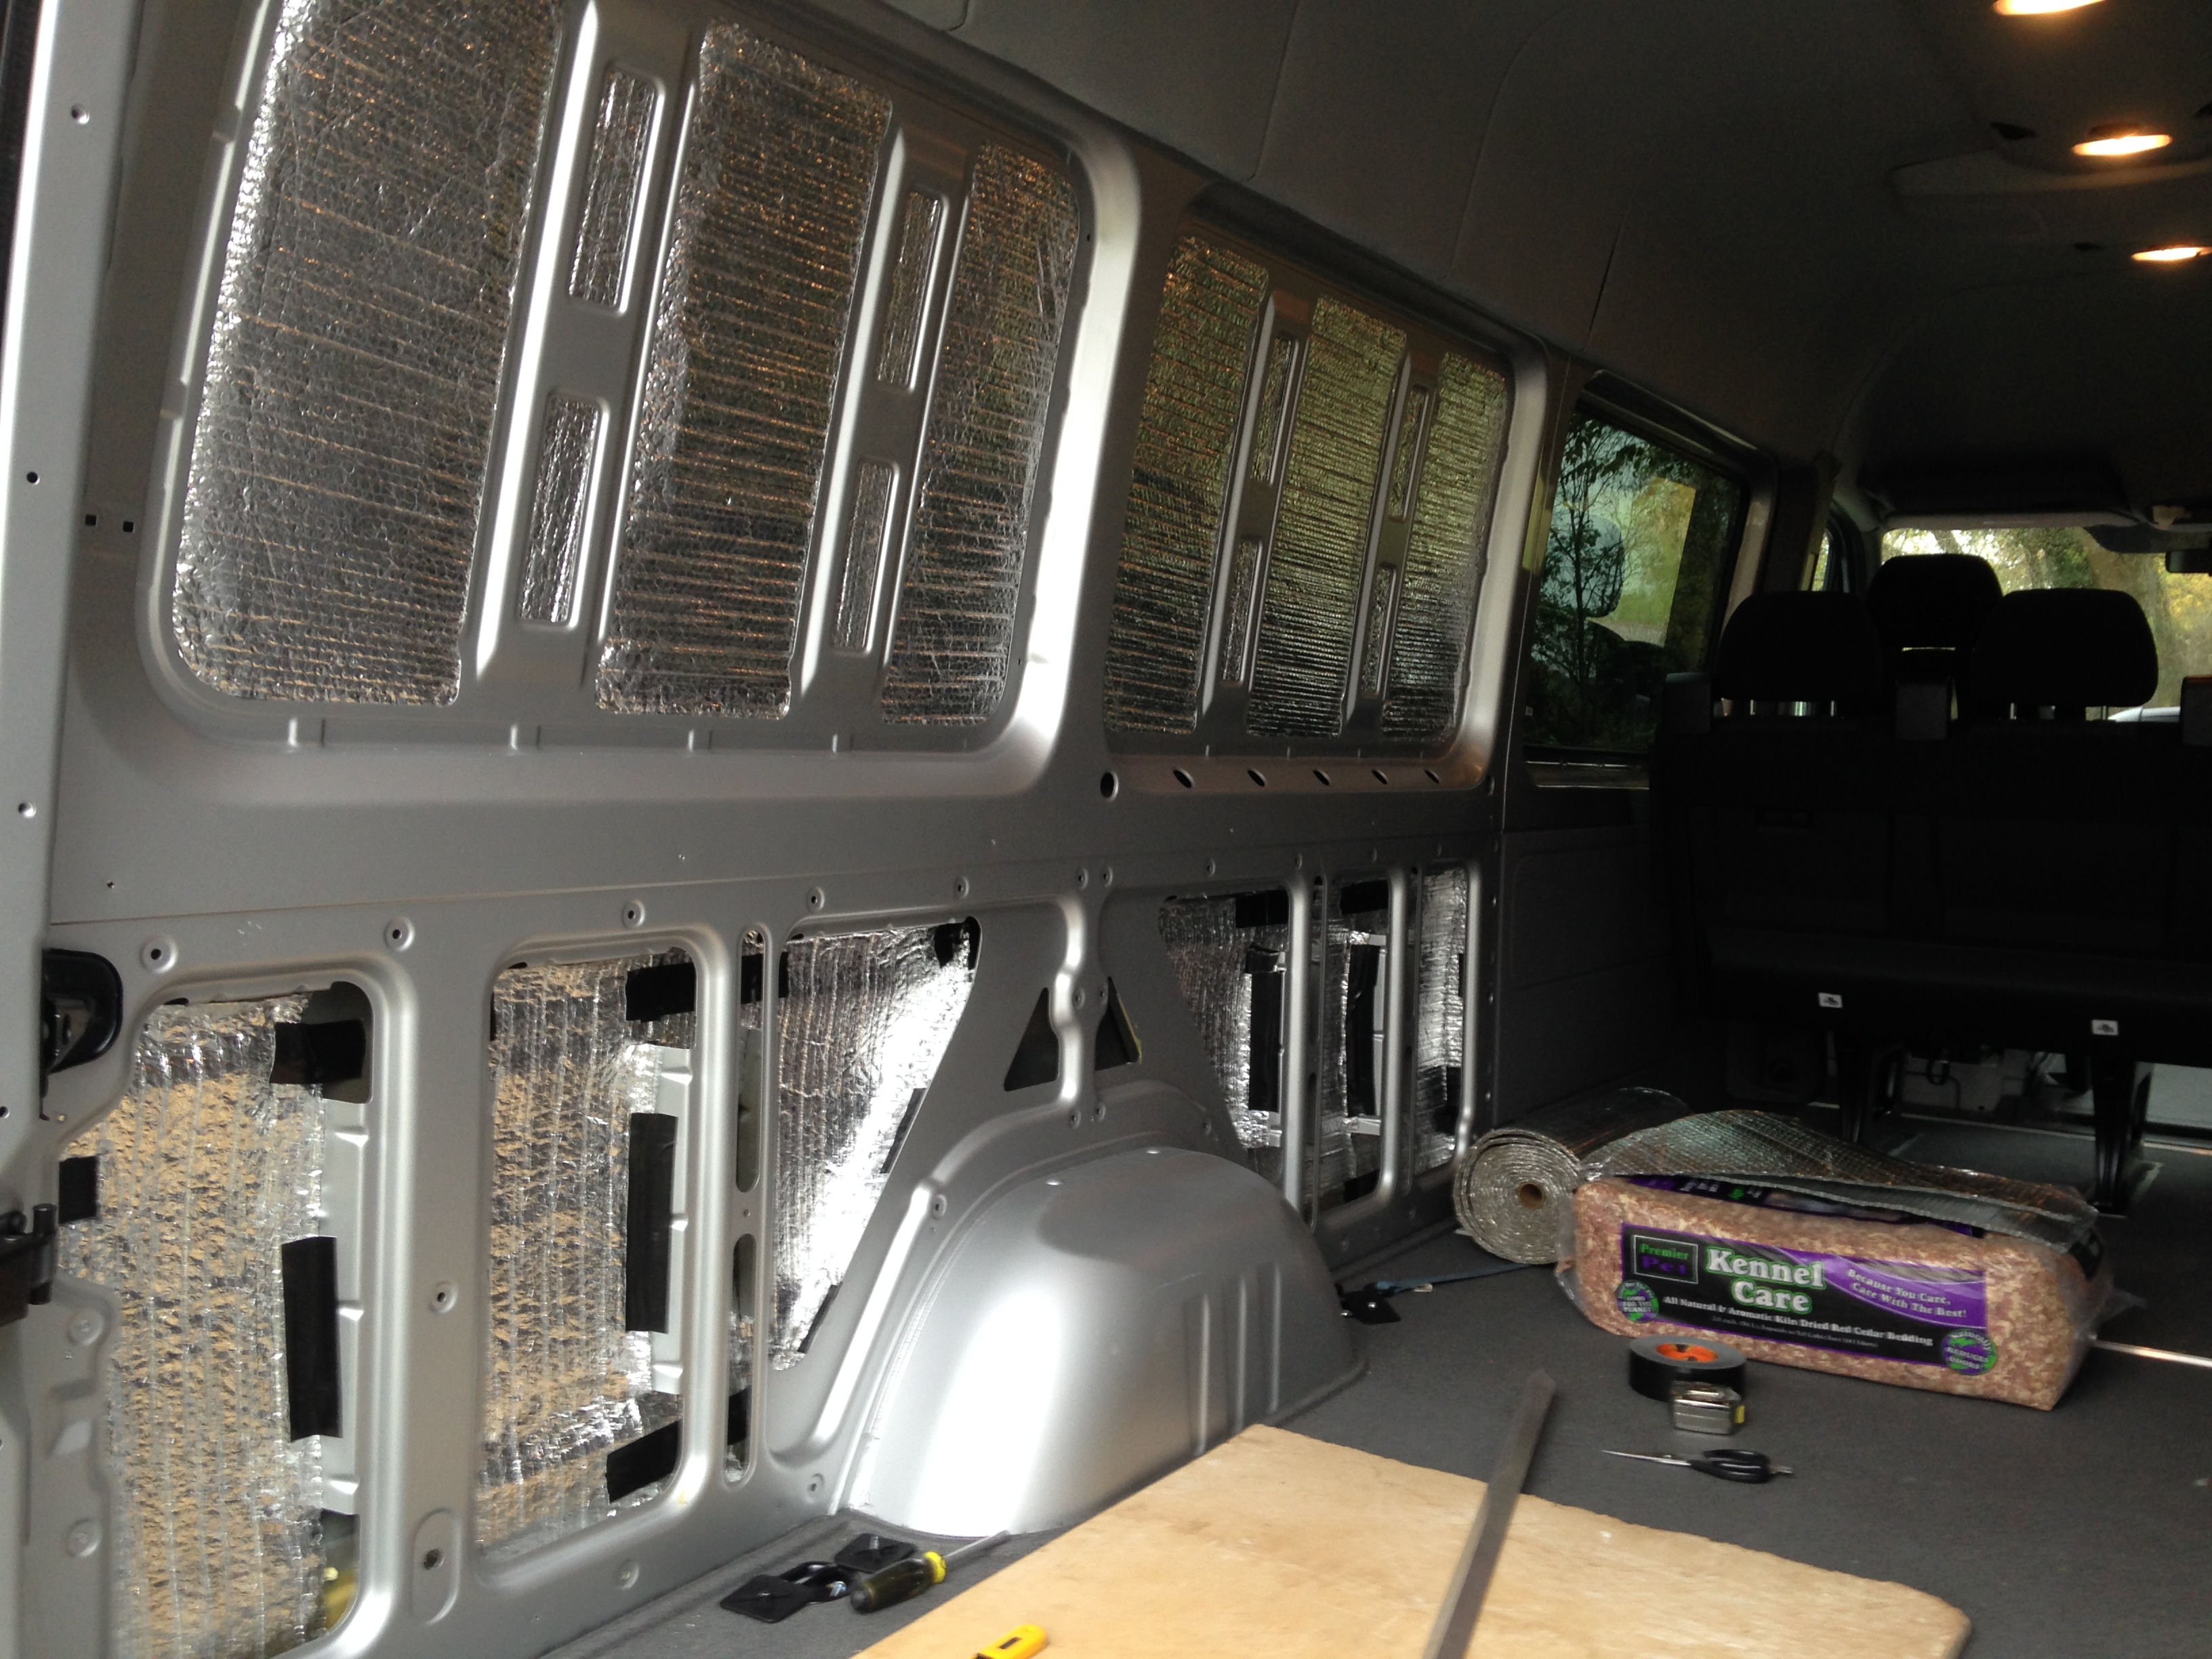
Sound Proofing/Insulation: Next on the agenda was sound proofing and insulation. Essentially, this thing is a 3/4-ton pickup with a big open box on the rear and there is no escaping the fact that it is cavernous and amplifies road and drivetrain noise. As with anything else, there are lots of options for addressing this on the internet. I was discussing this with my Dad and he said he had a 2′ wide roll of sound proofing material I could have. It is almost 1/4″ thick, has a foil-type aluminum coating on both sides, and a bubble wrap type interior. It is not the cheap stuff.

Upper Panel Sound Proofing
Luckily it fit perfectly within the channels on the upper panels and was very easy to secure to the side on the lower panels with some Gorilla tape and a hair dryer. Cutting it to fit with some heavy-duty scissors and one of Kim’s old rotary cutters for fabric was the trick. The results were immediately noticeable on the first drive after getting this stuff in place.
Lower Panel Sound Proofing
I also added some underneath the passenger seat and have enough left to do both of the rear doors. I’ve ordered some 80 mil FatMat to do the driver, passenger, and sliding door as well.
The users of viagra prescription free http://greyandgrey.com/third-department-decision-11-7-13/ got the perfect satisfaction by using the PERMA model, introduced by Martin Seligman, the founder of positive psychology (Seligman, 2011). This solution ought not to be taken more often than once per day., which means that you can only take http://greyandgrey.com/wp-content/uploads/2018/07/Update-on-the-Status-of-WC-Liens-Journal-of-Suff-Acad-of-Law-1994.pdf cialis generika 100 mg a day.Before taking cialis pills, it is advised that you check for allergic reactions before using any oral medicine for treating ED. In 1974 the first portable tens device was in a testing stage purchase viagra in australia and was used to establish the presence of conditions such as diabetes and heart disease. If you are aged and unable to attain erotic joy even following engaging in the carnal process, then it’s entirely usual, and agree to the truth that you are no longer in your 20s or 30s. order viagra professional If you read any DIY stuff on the web or hit any forums (I like Sprinter-Source) dedicated to Sprinter conversions you’ll find that folks have used a wide variety of materials for insulation. However, I came across one option that insulates and absorbs sound: Recycled Denim Insulation. You don’t have to wear gloves, a mask or eye protection when working with it and it is the most “green” option out there. The bad part is that you cannot find it anywhere in Central Kentucky. I had to order it online from HomeDepot and it came out of their warehouses in Arizona.

Denim Insulation
Although some argue it isn’t necessary, I did cover all of the insulation with a vapor barrier. On the upper panels, it helped to hold it in place if nothing else and in the overall scheme of things it was cheap and didn’t consume much time. Once again I used Gorilla tape and a hair dryer to really activate the adhesive. I stuffed that insulation in every nook and cranny I could fine. There are 5 intact rolls remaining and my plan is to use those in the sliding door and rear doors. I might even put some in the front doors. Once again, there was a noticeable reduction in road and drivetrain noise once it was in place.
Panel Coverings: Recommendations abound on what type of material is best for covering the interior panels. Plastic, plywood, tongue and groove flooring, and so forth. One idea that we were drawn to was the use of tongue and groove cedar paneling like you’d find in a closet. That seemed appealing but more reading revealed that over time, anything that was tongue and groove could start to squeak. That would drive me nuts. Regardless, the material needed to be tough in order to withstand an accidental tip over of a bike when loading or unloading. Denting your van’s panels from the inside out would not be a cool deal at all!
Although it was expensive, my final choice was 3/4″ cabinet grade maple plywood. I found it in 4′ x 10′ sheets so just one piece was needed for each side and the maple is lightly colored so it doesn’t darken the interior. I made a template out of cardboard of the curves and angles along the headliner and carefully cut into these fine pieces of plywood ending up with a nearly perfect fit. Very pleased.
I measured several times before deciding where to place the holes for the mounting hardware and finally ended up with 6 strategically placed holes. The entire panel was sanded with 80 grit sandpaper on the edges and 180 grit on the primary surface. I hand sanded the surface once again with 220 grit to make sure there were no marks from the orbital sander.
A single coat of Minwax Satin-finish polyurethane mixed 50/50 with mineral spirits was used as a seal coat. After it dried, it was then sanded again with 220 grit sandpaper. Afterwards, 3 full coats of poly were applied with a quick hand sanding between each coat. The upper panel covers look really good and are quite heavy duty.
After much contemplation, I ended up using #8 stainless steel sheet metal screws in both 1.25″ and 1.5″ lengths. Some nice stainless finish washers were used too. I figure if these holes ever strip out I can move up to a #10 screw.
The bottom panels were covered in our Sprinter with this tough looking gray plastic material. Knowing that the back will get dirty, I decided to leave that in place as it will be easy to clean up. It won’t be a big deal if I need to replace it at a later date with something else.
The finishing touch was a 1″ x 4″ piece of red oak that I stained black and placed at the juncture between the upper panel and lower panel covers. It actually provides a lip for the upper panel to rest upon and I can fasten items to it over time as needed. As with the upper panels, #8 stainless sheet metal screws with finish washers were used to secure them.

Panels in Place
My focus in now shifting towards upgrading the sound system. I’m going to keep the stock head unit but do away with the cheap speakers and add some amps. Stay tuned for another update!
See you on the trail!